Vikunja
What is Vikunja
From https://vikunja.io/
note
Vikunja is an Open-Source, self-hosted To-Do list application for all platforms. It is licensed under the GPLv3.
note
This is based on authentik 2021.7.3 and Vikunja V0.17.1 using the Docker-Compose install https://vikunja.io/docs/full-docker-example/. Instructions may differ between versions.
Preparation
The following placeholders will be used:
vik.companyis the FQDN of Vikunja.authentik.companyis the FQDN of authentik.
Step 1
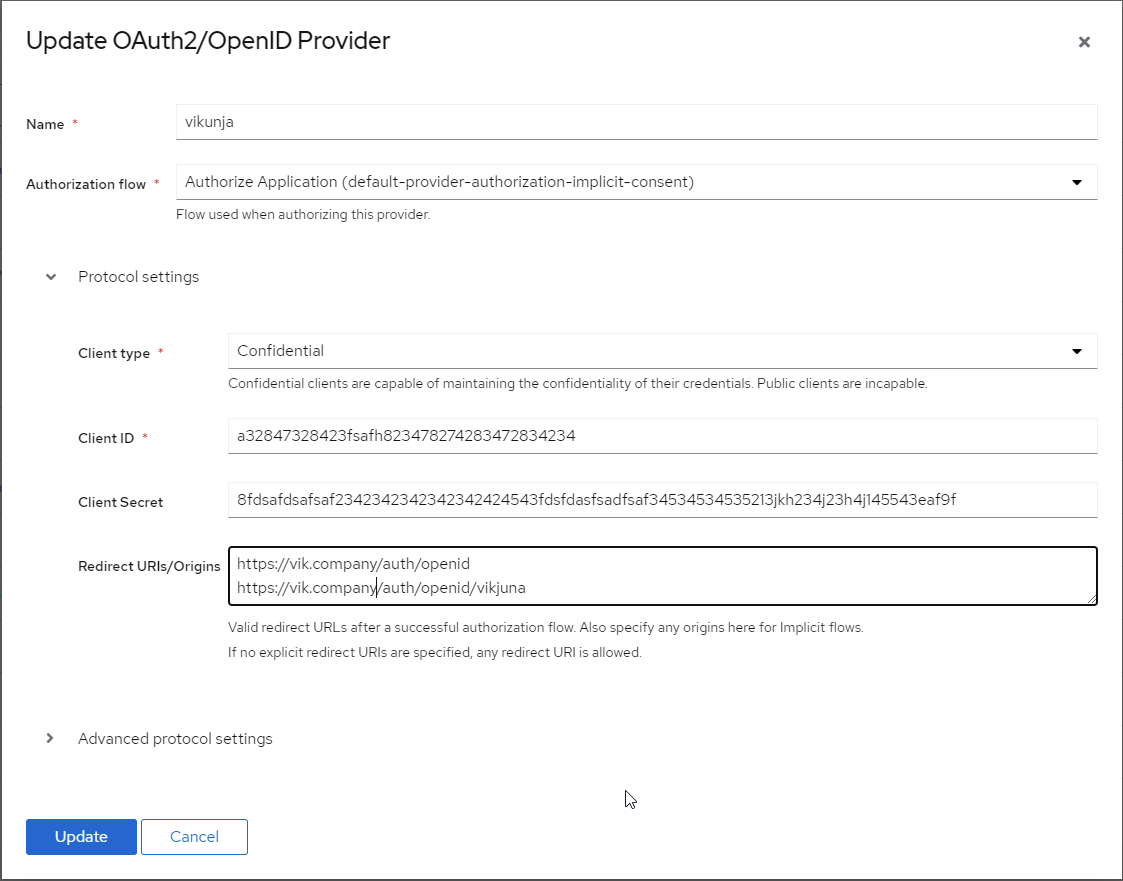
In authentik, under Providers, create an OAuth2/OpenID Provider with these settings:
note
Only settings that have been modified from default have been listed.
Protocol Settings
- Name: Vikunja
- Client type: Confidential
- Client ID: Copy and Save this for Later
- Client Secret: Copy and Save this for later
- Redirect URIs/Origins:
https://vik.company/auth/openid
https://vik.company/auth/openid/Vikunja
Step 2
Edit/Create you config.yml file for Vikunja
Incorporate the following example Auth block into your config.yml
auth:
  # Local authentication will let users log in and register (if enabled) through the db.
  # This is the default auth mechanism and does not require any additional configuration.
  local:
    # Enable or disable local authentication
    enabled: true
  # OpenID configuration will allow users to authenticate through a third-party OpenID Connect compatible provider.<br/>
  # The provider needs to support the `openid`, `profile` and `email` scopes.<br/>
  # **Note:** Some openid providers (like gitlab) only make the email of the user available through openid claims if they have set it to be publicly visible.
  # If the email is not public in those cases, authenticating will fail.
  # **Note 2:** The frontend expects to be redirected after authentication by the third party
  # to <frontend-url>/auth/openid/<auth key>. Please make sure to configure the redirect url with your third party
  # auth service accordingly if you're using the default Vikunja frontend.
  # Take a look at the [default config file](https://kolaente.dev/vikunja/api/src/branch/main/config.yml.sample) for more information about how to configure openid authentication.
  openid:
    # Enable or disable OpenID Connect authentication
    enabled: true
    # The url to redirect clients to. Defaults to the configured frontend url. If you're using Vikunja with the official
    # frontend, you don't need to change this value.
    redirecturl: https://vik.company/auth/openid/
    # A list of enabled providers
    providers:
      # The name of the provider as it will appear in the frontend.
      - name: vikunja
        # The auth url to send users to if they want to authenticate using OpenID Connect.
        authurl: https://authentik.company/application/o/vikunja/
        # The client ID used to authenticate Vikunja at the OpenID Connect provider.
        clientid: THIS IS THE CLIENT ID YOU COPIED FROM STEP 1 in authentik
        # The client secret used to authenticate Vikunja at the OpenID Connect provider.
        clientsecret: THIS IS THE CLIENT SECRET YOU COPIED FROM STEP 1 in authentik
note
Vikunja Reference link: https://vikunja.io/docs/config-options/#auth
Step 3
In authentik, create an application which uses this provider. Optionally apply access restrictions to the application using policy bindings.
- Name: Vikunja
- Slug: vikunja
- Provider: vikunja
- Launch URL: https://vik.company
Notes
note
Recommend you restart the Vikunja stack after making the config file changes.